The question gets asked on the Hobie forum every spring in the same words: I stepped on the deck in front of the pylons and it felt soft, what does this mean, will the hull fall apart. The answer has been the same since 1988, when the Hotline ran an article explaining the foam sandwich and a companion column explaining how to glue it back together.12 The forum has spent the years since arguing about syringes and foam. This article pulls it all together, because the forum is closing and the Hotline scans are big files on a server that may not stay up.
The sandwich
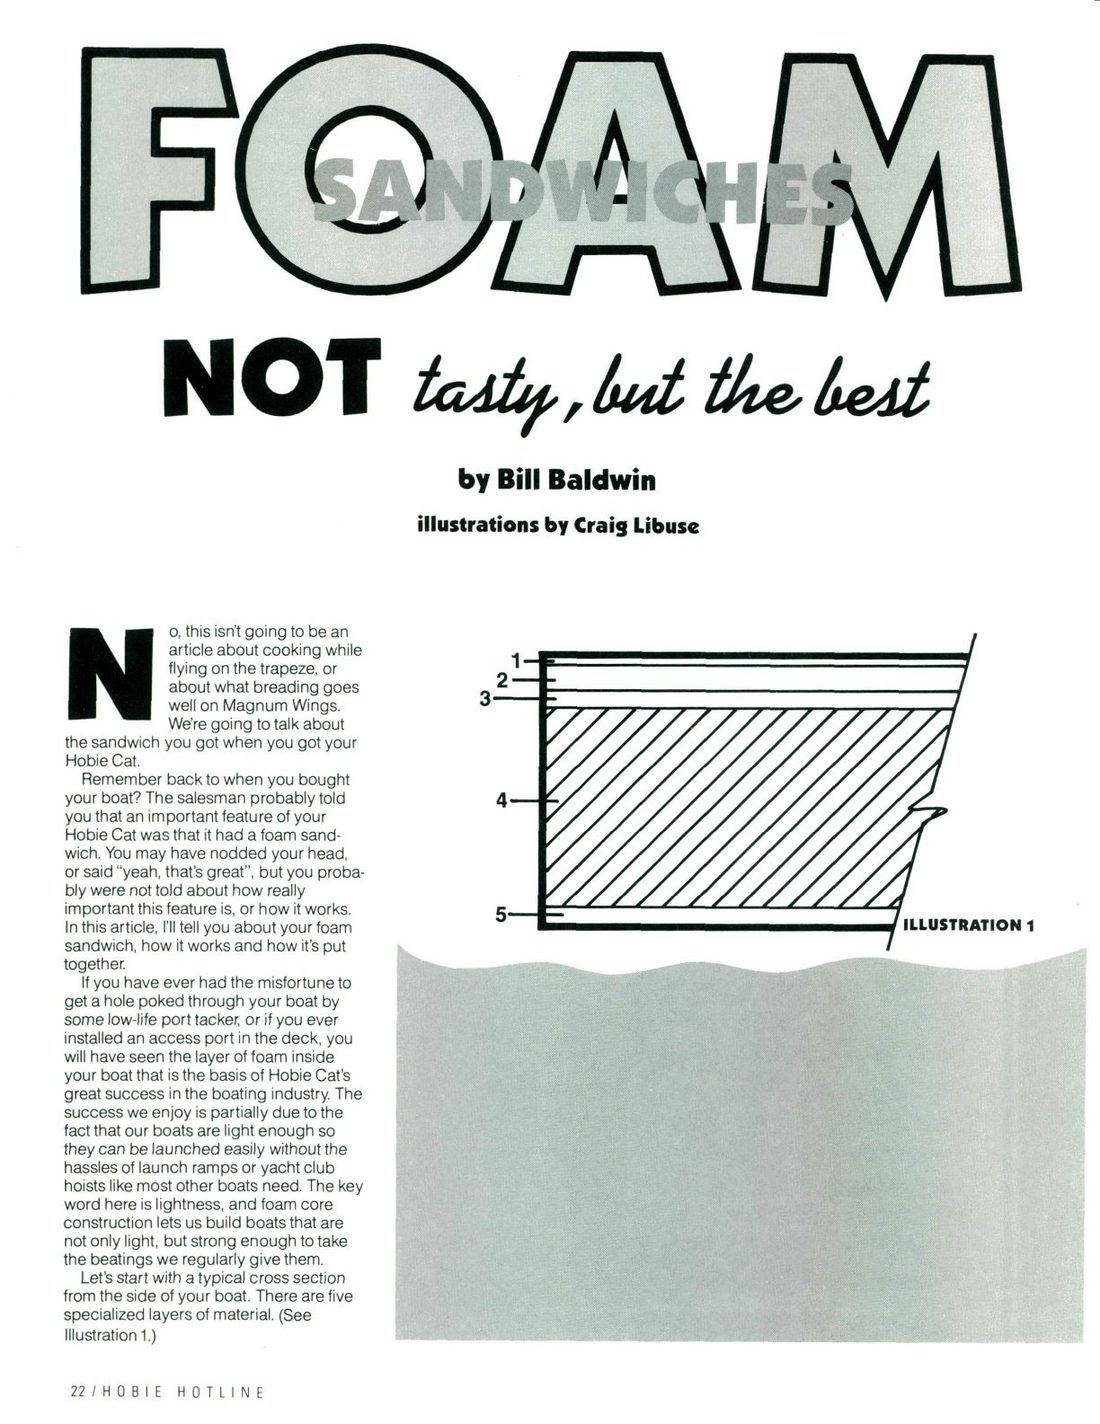
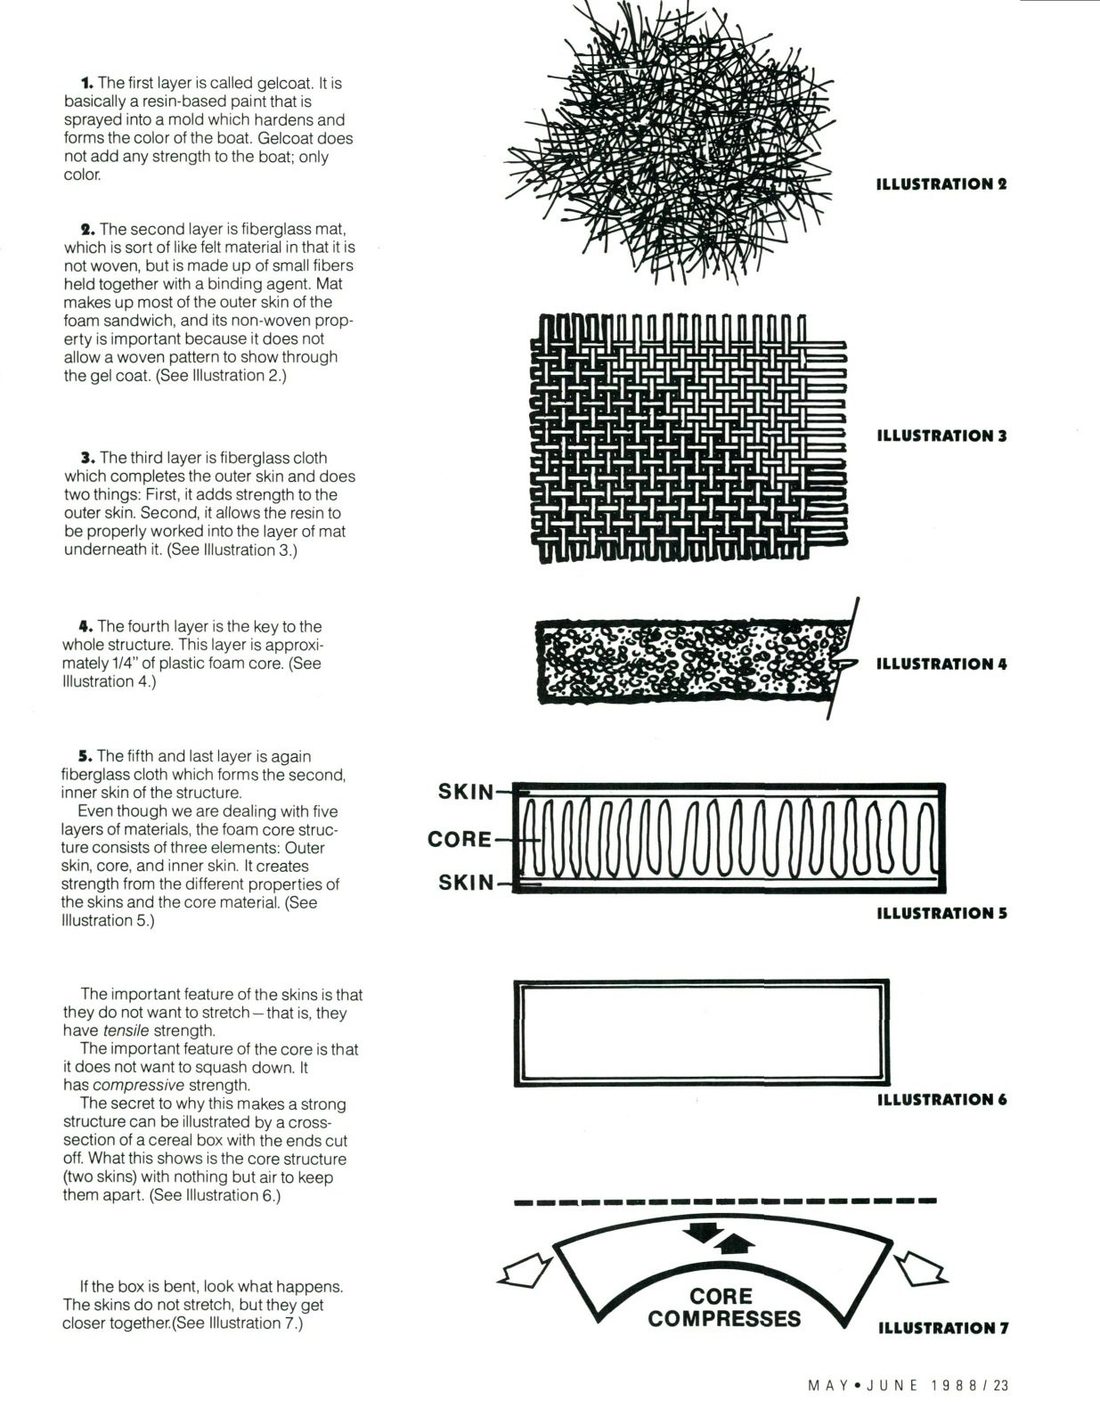
A Hobie hull is not solid fiberglass. In the May/June 1988 Hotline, Bill Baldwin described the cross-section as five layers: gelcoat, which is colored resin sprayed into the mold and adds nothing but color; a layer of non-woven fiberglass mat that keeps the weave from printing through; a layer of woven cloth that finishes the outer skin; about a quarter inch of plastic foam; and a final layer of cloth that forms the inner skin.1 John Hackney's column in the same issue gives the outer skin as about an eighth of an inch and the foam as three eighths.2 Matt Miller, who ran Hobie Cat USA's warranty and technical support for decades, put the glass at a sixteenth to an eighth.13
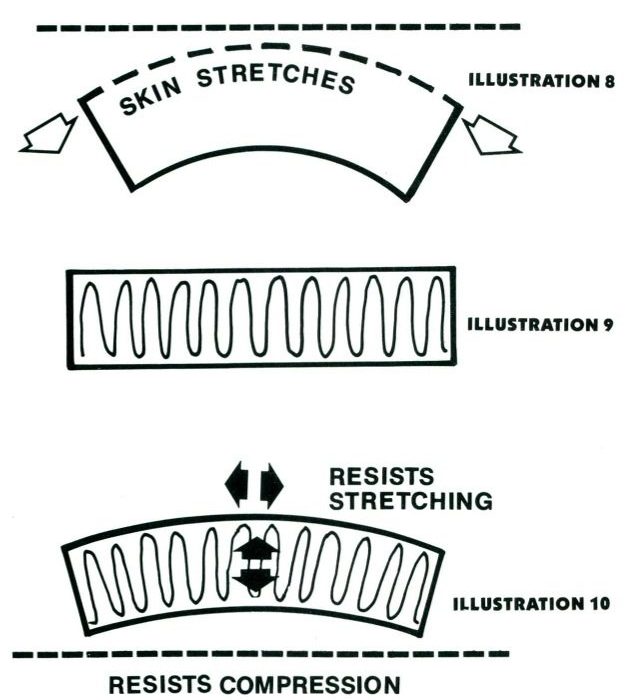
Baldwin's explanation of why this works is the clearest ever printed for Hobie owners. The skins do not want to stretch; the core does not want to squash. Bend a cereal box with the ends cut off and the two faces simply move closer together. Glue a slab of foam between them and the top face cannot shorten, because the foam will not compress, and cannot stretch, because glass has tensile strength. "Because all three of these elements are glued together you get a structure that does not want to bend." The result resists bending like a solid laminate that would weigh many times more, which is what lets a 320-pound boat be dragged up a beach.1
Everything about soft decks follows from the word glued. A soft spot is a place where the bond between a skin and the foam has let go. The glass is usually fine. The foam is usually fine. Matt Bounds, the forum's long-serving moderator, has said it more bluntly than anyone: "when hulls/decks delaminate, it's not the foam or the laminate at fault. It's the bond between the layers that's failed. The only way to truly restore that bond is with a chemical adhesive - epoxy."8
Not every part of the hull is cored, and that matters when you drill. On the Hobie 18, srm (the forum's most prolific repair adviser) describes about ninety percent of the hull as sandwich, with the bottom few inches of the hull, the very bow, the crossbar saddles and the shroud anchor points laid up solid.12 Miller adds that the foam in the deck "is only located inboard of approx the edge of the non-skid pattern."13 One owner learned the hard way that there is no core within about three inches of the deck edge along the whole hull: "you will drill all the way through even with a proper drill stop. Ask me how I know."12 The loose blocks of foam you can see through an inspection port are flotation, not structure. "These are loose inside all Hobie Cats."13
Where decks go soft, and why
Baldwin named the classic location in 1988: "decks just forward of the front crossbars where the stress of the bridle pulling inward is concentrated, and where sailors tend to step down ungently from the frame. After a while, repeated stresses and shocks can get a soft spot started, and it will continue to grow in size unless it is repaired."1 Hobie's FAQ says the same about the consequence: "Soft areas in decks near or ahead of the forward cross bar can cause complete failure of the bow and must be repaired before sailing the boat."3 It is not an idle warning. The forum has a running collection of photographs of Hobie 16 and 18 bows folded upward at the front pylons, and when a 2010 poster asked whether anyone had ever seen a hull fail there, Bounds answered with one of them: "Didn't have a port. Didn't need one. Broke anyway."5
The other places are predictable once you think about where people land. On the 18 and 17 it is the deck just forward of the rear crossbar, where the skipper comes in off the wire and sits down hard; one 1988 Hobie 18 bought new has exactly one soft spot, there.1811 On the 18 and the 20 it is the strip of deck beside the daggerboard trunk, where you stand to right the boat and where the stiff trunk meets a flat deck; the 20's owners describe gelcoat cracks at the ends of the trunk and soft deck alongside as a known pattern on a boat with "a flat deck".14 On the 14 and 16 it is the sides of the hull just below the deck lip near the pylons, and on any boat it is where the deck has been stepped on for thirty years.10
Age and construction play a part too. Heat, water in the core and plain cycling can break the bond anywhere. Miller lists the causes as "heat, repeated compression (walking on) or other factors related to materials and age."3 Folk wisdom on the forum holds that 1979 was the worst year for Hobie 16 soft spots, but nobody has ever documented why.28 The Hobie 18 story is better known and is often misdescribed as a delamination problem. Miller: "Issues with 84-87 H18 hulls was not delamination. It was primarily cracking at the crossbar connections," caused by a reduced glass patch inside the hull during the weight-saving years, made worse by wings, patched with stainless plates in 1985-86 and cured with a big glass patch in 1988-89.18 The identification guide on this site covers how to spot those hulls.
How fast does it go? One owner thought his 18 might be a little spongy one year and could move it with his thumb the next: "When these things get soft, boy do they ever go soft!"11 Another had a previous owner who had sailed a flexing deck for six years without it getting worse.10 Both are normal. What is not normal is a hull that is soft everywhere, which is a different problem with a different answer, below.

Diagnosis: is it delamination, and how much
Press with the palm of your hand, then with a thumb, over every part of the deck and the hull sides, paying particular attention to the area in front of the front pylons. A healthy deck does not move under a thumb. Knock on it: Hobie's diagram says "you can knock on the deck and hear the difference between the solid areas and the soft one," and owners describe a dead thud instead of a tap.428 A crackling sound under pressure means the skin is grinding on broken foam.7 Mark the edge of the soft area with pencil or tape as you go. Be generous; when one owner mapped a spot he thought was a foot long he found it "quite a bit bigger than I had initially thought," and the edge is rarely a clean line.11
Three other things can feel like delamination and are not. First, cracked glass. A Hobie 17 owner who could not find the telltale gap between layers no matter where he drilled finally cut the deck open and found "large cracks in the fiberglass running parallel with the length of the hull. No amount of resin injected into this area would have helped."13 Second, a split inner skin. Two separate Hobie 18 owners injecting the spot forward of the rear crossbar waited for epoxy to appear at the breather holes and instead found it running down the inside of the hull, because the inner skin had cracked open.1112 Third, an inner-skin separation rather than an outer one. Delamination "may be present on either side of the foam layer," as Hobie's sheet says, and when it is the inner skin that has let go the outline is hard to find and the perimeter holes may not connect to the void.411
So before you drill, look inside. If the boat has an inspection port, put a light and a mirror, or a phone camera, through it and inspect the inner skin under the soft area.12 If the skin is cracked, the repair is a glass job from inside, not an injection. If you have no port, the drill will tell you: shavings that come out wet mean the core has taken water and must be dried before anything is injected, and a hole that free-falls a quarter inch means the foam under it is gone, not just unbonded.525
Then decide whether the hull is worth it. srm's rule from a 2015 thread about a 1970 Hobie 14 is the one the forum uses: small areas inject well; "for larger areas, or areas that are saturated with water, you will likely need to cut out the existing core and re-build the laminate"; and "the entire top of the hull is soft = the hull is shot."7 The same thread adds the urgency: "once delam starts, if you don't repair it soon enough, the entire hull will go soft and eventually fail."7 A boat that develops a new soft spot every season is telling you that the bond is failing everywhere, and the owners who have been there advise keeping the bows solid, sailing it gently and shopping for later hulls.11
Materials and tools
Epoxy. Hobie's recommendation, repeated by Miller in nearly every thread from 2004 to 2019, is Git Rot, a thin penetrating epoxy sold in a kit with its own squeeze bottle.317 Its virtue is that it flows into a paper-thin gap; its drawback is price, and some owners find it stays slightly flexible.22 The other camp uses West System 105 resin with 206 slow hardener, thickened a little. Hackney's 1988 column says "any marine epoxy will do the job" if thickened with Cab-O-Sil "to about the consistency of mustard"; the Beachcats method uses 404 high-density filler; the Hobie 18 procedure below uses 404 or 408 mixed to syrup.21911 Thicker epoxy fills a bigger void and leaks less through a perforated inner skin; thinner epoxy travels further between skins that are still touching. Use slow hardener, because the job takes hours; one owner who used it anyway complained that each injection meant an hour's wait, and wished for the fast hardener in cool weather.5 Buy the calibrated pumps; everyone who has used them says so.5
How much. Less than you think. Miller: "it takes very little epoxy to do the job. We are talking a paper thin void area. Like between the pages of a phone book... Anyone who uses much epoxy has either drilled right through the two glass layers, pumped it in and expanded the layers apart or just ended up with a bunch of excess glue all over the place."8 Real numbers from owners: ten pumps of West System for a foot-square spot on an 18; about a quart each of resin and hardener for a two-foot spot on a 16; "about a pint per two-foot delamination" on a 1975 boat; and, at the other end, over a gallon and twenty condiment bottles for two 1976 hulls that were soft nearly everywhere, which is the kind of hull srm tells you to scrap.1152417
Syringes. Hackney suggested 50 cc syringes from a hobby shop or a veterinary supply house; owners still get free livestock syringes from the vet, buy West System's 807 syringes and trim the tip to fit the hole, or use the pointed-tip syringes from Jamestown Distributors. Medical syringes with a needle fitting do not seal in the hole.2245 For a large area an empty caulk tube in a caulk gun works.5 Hobie's own sheet says a plastic bottle with a nipple cut to size.4
Drilling. A 1/8-inch bit, or a #31, with a drill stop, which is a cheap collar that clamps on the bit and physically cannot go deeper than you set.1112 Tape wrapped on the bit works as a visual mark but will not stop the drill. The outer skin is thinner than an eighth of an inch, and on the Hobie 17 "you only had to drill a couple or three millimeters deep to get to where you need to be. Any more and you've gone through all the way."7 Also get a nail bent at ninety degrees, a shop vac, masking tape, newspaper, paper towels, acetone, gloves and eye protection: "High pressure resin being shot in your eye is not a good thing."6
The injection repair
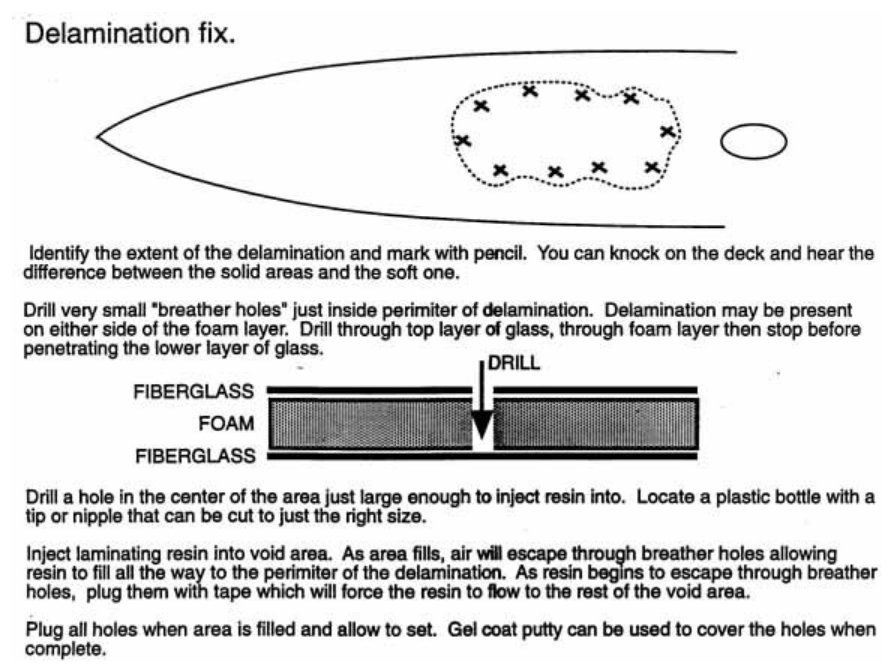
There are two schools, and they differ only in how many holes you drill. Hobie's official sheet, and Hackney's 1988 version of it, use one injection hole in the middle of the soft area and small breather holes just inside its edge; the resin is pushed in at the center and chases the air out at the perimeter.42 The Beachcats method, from 2003, drills a grid of holes across the whole area an inch to three inches apart and injects at every one until epoxy shows at its neighbors.1921 A poster asked in 2004 whether Hobie's fewer-holes method leaves voids; nobody ever answered with a comparison. In practice the grid wins on big or irregular spots and on inner-skin separations where the center hole may not find the void, and the Hobie method wins on small clean spots and makes less mess. The owner-written procedure below is a hybrid, and it is how most successful forum repairs were done.
- Work flat, dry and warm. A deck can be done with the boat assembled. A hull side cannot; take the hull off and lay it on sawhorses with the soft area up, so the air can escape upward. Miller: "The construction is exactly the same top and sides. If you can lay flat... that should make it easier."15 Stay inside the epoxy's temperature range and out of direct sun. If the core is wet, draw the water out with a shop vac over the hole and dry it with a heat lamp for a day or more before you go on.25
- Map and mask. Find the outline by pressing and tapping and draw it. Cover the deck around and over the area with masking tape and the rest with newspaper, then drill through the tape. The epoxy will come out of the breathers, it will get into the non-skid, it will yellow in the sun, and "no way to clean it out."611
- Mark the holes. Breathers every inch or two just inside the pencil line, one injection hole in the center, and, if the area is large or lumpy, a grid across it at one-and-a-half to three inches. The perimeter holes must be inside the soft area: "If you drill them too far out, you'll miss the soft spot and the air and epoxy will be trapped and unable to escape."11 Keep clear of the outboard three inches of the deck where there is no core.12
- Drill the outer skin only. Light pressure, drill stop set shallow, and stop the moment you feel it break through. "A sharp drill bit will cut through the foam easily by just spinning it with your fingers. This way you can feel when you make contact with the bottom skin."6 Clear foam from the hole with the bent nail spun in it and vacuum the dust out. Some owners prefer a Dremel for the control.5 If you do go through the inner skin, plug it from inside or with cotton before injecting, or your epoxy will end up on the bilge.24
- Check for leaks before you commit. Inject a little at the center and wait for it to show at a breather. If nothing appears after a reasonable amount, stop: either the inner skin is split and the epoxy is running into the hull, or the holes are outside the void.12 One owner who could not see inside flipped the hull gelcoat-down and injected upward to keep gravity on his side; thickened epoxy is the other answer.5
- Inject. Mix small batches, about five pumps at a time. Start at the center, or at the lowest holes if the surface slopes, and push until epoxy appears at the next hole. Press on the middle of the spot a few times to pump it outward. When a breather weeps, tape over it so the resin is forced toward the next one. "As resin begins to escape through breather holes, plug them with tape which will force the resin to flow to the rest of the void area."411 On the grid method, work one row at a time and tape each row as it fills.21
- Hold the skins together. On an outer-skin delamination the skin is already lying on the foam and needs nothing. On an inner-skin separation Rob Morse drives #8 x 1-inch sheet-metal screws, coated with release wax, through the holes until the inner skin pulls up against the core, then removes them after cure and fills the holes with thick epoxy to leave solid plugs between the skins; the screw-hole method draws objections because it punctures the inner skin, so use it only where you know the inner skin has let go.20 Sticks wedged inside the hull through a port do the same job without holes.24
- Cure and top up. Pull the tape and let the holes ooze freely while the epoxy gels, wiping the excess. The plugs shrink back into the holes as they cure and need refilling once or twice to come out flush.12 Leave it 24 to 48 hours, then press it. It should be hard, and the surrounding area that felt spongy often firms up too, because it was only unsupported.11

Finishing
Once cured, cut the plugs flush with a chisel or a sharp blade. Hackney's finish is the one to follow: re-drill each hole slightly, fill with color-matched gelcoat from a dealer's Match and Patch kit, let it harden, then wet-sand with 220, 400 and 600 and polish with rubbing compound, "and you'll probably need to use rubbing compound on the whole boat because your repair job will have had all the sun oxidation removed and will look better than the rest of the boat."2 A Hobie 18 owner takes the sanding on to 800 through 1500 grit before buffing.11
Two chemistry facts. Polyester gelcoat does not cure well over epoxy: it is air-inhibited, so it either needs a vapor barrier (Miller suggests coating it with polyvinyl acetate) or you use a white epoxy filler like Marine-Tex in the holes instead.1714 And the Hotline's "This Old Hobie" column warns that gelcoat sprayed over epoxy tends to delaminate later, because epoxy cures less porous and leaves an amine blush, so for visible glass repairs the column uses polyester or vinylester, "the resin the boat was originally built with."26 Epoxy is still the right adhesive for the injection; it is just not what you want directly under gelcoat.
If the plugs land in the non-skid, hide them with deck pad or carpet rather than paint. Paint on a thirty-year hull is a last resort: "Paint has a life that when it's over is more than likely the end of the boat."12 And cover the boat; a twenty-dollar tarp with grommets is cheaper than a trampoline.
What not to inject
Every few years someone discovers a can of expanding foam and announces that Hobie should endorse it. Miller's 2007 do-not list is the standard reply:9
There are only two good ways to repair delamination... Inject epoxy or cut it open and scrape out the bad foam and re-fill with solid glass.
Do Not: Use Great Stuff (wall foam not water proof and will absorb water). Use Gorilla Glue (too thick and does not penetrate to completely repair the delamination). Use expanding foam... again, does not penetrate and causes the surfaces to be forced apart as it expands.
Matt Miller, Hobie Cat USA, March 2007
The arguments against each are specific. Great Stuff is open-cell enough to take water, adds weight, and "can apply incredible force when contained - I've seen it bend door jambs and push bricks out."8 Gorilla Glue foams on contact with moisture; a canoe owner who put ten drops into a damp core got a foam blob two inches across.5 Foam of any kind "will not achieve" the re-bond, and "the soft spot will remain soft and continue to grow."16 The best evidence is a side-by-side: one owner fixed one hull of his 16 with Git Rot and the other with Gorilla Glue to save money. A year later "the side I used Git Rot on is still rock hard, while the GG side is not."5
Honesty requires two counter-examples. In 2013 a Beachcats member sawed open a Hobie 14 deck that a retired engineer had repaired five years earlier with Great Stuff through quarter-inch holes two inches apart. The foam had bonded to both skins and the original core and the deck was solid; the thread does not say whether the foam had taken water, and the site's admin called it "an unusual alternative" that worked in that case.23 And an ocean sailor in Flagler Beach, after a Git Rot repair cracked when someone sat on it, cut ports ahead of the front pylons of his 1976 Hobie 16, tilted the boat, and poured two-part four-pound marine polyurethane foam into the bows until they were solid from the tips back to the pylons. It added sixteen pounds per hull. Six years on he reported the decks still rock hard and no water in the foam, and he is clear that this is a beach-boat fix, that "you cannot pour foam between the layers of glass, it will blow the layers apart," and that a two-pound foam is only about 95 percent closed cell.910 Others pointed out that the foam does not re-bond anything; it props the skin from below. Miller settled the buoyancy claim: foam in a hollow hull adds weight, so the boat rides lower, and Whalers are foam-filled so they float broken, not higher.10
Resale is the other cost. "All the hobies that have traces of injection (whatever it was that was injected) are hard to sell," and the prediction from 2006 that "have you ever injected the boat with foam?" would become a standard question in the used market has come true.8
When injection is not enough
Cracked skins. A cracked outer skin is a normal fiberglass repair: grind back, lay new glass, fair, gelcoat. A cracked inner skin under a deck is reached through an inspection port and glassed from inside; srm's advice for the area forward of the rear crossbar on an 18 is to inject first, and if the deck still moves, add a five-inch port and reinforce from inside, keeping the port at least eight inches aft of the crossbar.12 Many 18 owners add a port there anyway for ventilation and to get at the rear crossbar anchors.
Bulkheads. The Hotline ran an article in July/August 2009 on fitting under-deck bulkheads forward of the rear crossbar on the 18. Miller's view: "Epoxy done correctly is all you need. Bulkheads won't cure delamination." srm's: they will not cure it, "but they will greatly reduce the flexing. Repetitive flexing is what ultimately causes delam in that area."11 Inject first; keep the bulkhead in reserve.
Ports in front of the pylons. Cutting a six-inch hole in the most stressed part of the deck to glass it from inside is the one approach the forum rejects outright. Laminating glass to the inside "won't do anything to re-connect the delaminated skin," and the hole removes the deck material that resists the compression a bow sees when the hull bends upward.5 If you buy a boat with ports there, treat them as a sign of an old repair and press hard around them.
Rotten core. Where the foam has gone to mush, or has been wet for years, the only real repair is Miller's second option: cut the outer skin, scrape out the bad foam, and rebuild with new core or solid glass. That is a fiberglass project beyond this article, and on a beach cat it is usually beyond the value of the hull.
Buying, selling, giving up
Every buyer's checklist on the forum starts the same way: press the decks, especially just in front of the front pylons, and "if there are soft spots, walk away."28 That is the right rule for someone who wants to sail this summer. It is too strict for someone who likes projects, and the price should reflect it. One owner knocked a 1970s 16 from $1,000 to $450 on soft spots and sailed it two seasons without stepping on them before buying a solid 1982 boat; another paid $175 for a boat with two ports ahead of the pylons and found it more solid than his first.5
The money is small either way. A quart of Git Rot or West System and a day's work is somewhere between $60 and $110, against replacement hulls at $3,000 each if they can be had at all.517 "$80 for one hull that will last probably 20 years... $2 per year."10 The honest range of outcomes: most well-done repairs on a contained spot come back "rock hard" and stay that way; a repair on a hull that was too far gone gives two more seasons and then flexes again; and a hull that is soft across the whole deck is not a repair, it is a parts boat.67
Do the repair early, because small is easy. But not too early. One owner tried to inject a Hobie 18 deck that only moved half an inch under 150 pounds, drilled 75 holes on a two-inch grid, and got no epoxy to flow anywhere, because the skins were still touching and there was no void to fill; the advice he got was that at that stage it is not yet a soft spot.22 Watch it, keep weight off it, and inject when a thumb can move it.